Shoes and Ladders

I have an infatuation with heels (and it's justified: I'm 5'2"!). Though we live in the same city, I do not have Carrie Bradshaw's closet space for them (my apartment = Carrie's closet size... sniff, sniff).

Carrie Bradshaw closet

... if only.

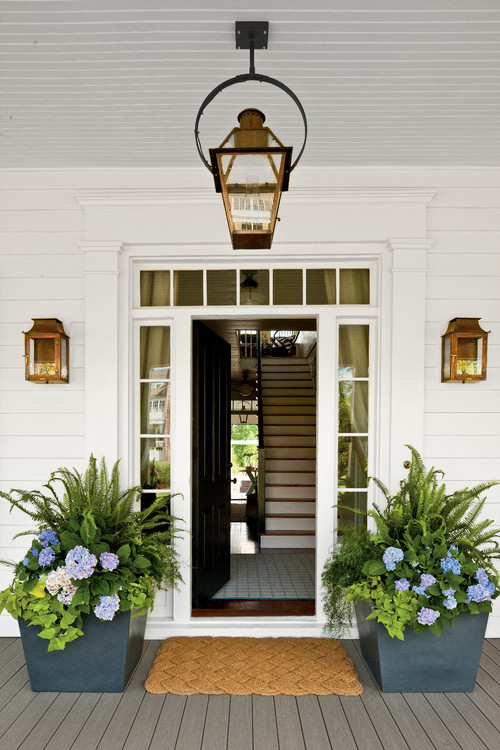
Welp, on to Plan B. This image has been in the back of my mind for years (literally... I think I pinned it right out of high school):

shoes ladder orig pin

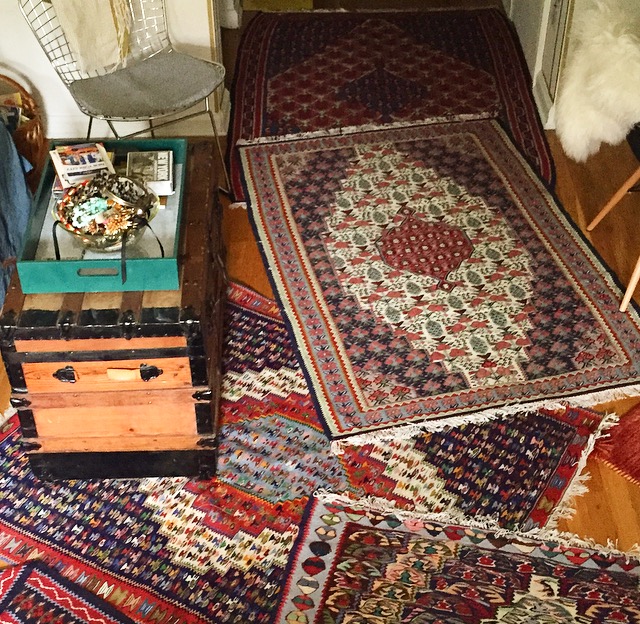
... and I had seen other ways that ladders were used for storage:

ladder inspo 2
ladder inspo 2
ladder inspo 1
ladder inspo 1

It's obviously not a novel idea... just last week I was in this fabulous shop in Brooklyn Heights, Collyer's Mansion, and snapped this picture:

ladder inspo 3
ladder inspo 3

I had looked all around for a vintage wood ladder, but they were pricier than I expected/wanted to spend, so I enlisted my long-suffering father for the task. Poor guy is doomed to be my workhorse forever.

I showed him the inspiration image of the ladder with shoes, drew a diagram of what I imagined in a ladder of my own, and the next thing I knew, he whipped this out.

ladder 1
ladder 1

Pretty amazing, right? And so much more special than anything I could've bought.

ladder6
ladder6

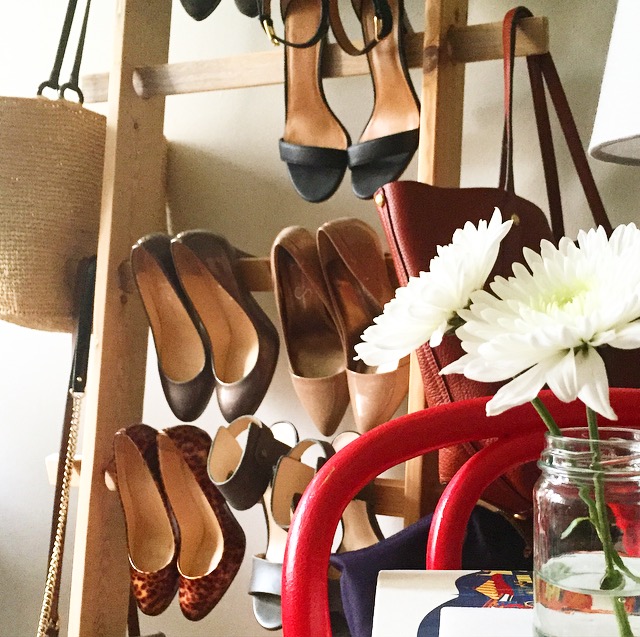
We had all the wood in the garage, most of it making up the shipping crates from our return from Saudi Arabia 17 years ago... it pays to be a pack rat! Details like that turn pieces in a room into stories.

ladder2
ladder2

And it doubles as a hanger for satchels and totes!

ladder4
ladder4

Even if the heels are gathering dust (city life and high heels don't mix), I love the vertical aspect of the ladder leaning against the wall. And maybe having them visible will be a reminder to stop buying them... flats are the way to go in this walking city! 

DIY: Atlas Desk

The desk in my studio is one of my favorite DIYs that I've done. I needed something to fill in the vacant space opposite the sofa, and I always find that a surface upon which to stack assorted piles is supremely helpful and necessary.

desk1-1
desk1-1

My parents' storage room is chock-full of all kinds of furniture--lucky for me and not so lucky for dear old Dad who bears the brunt of reorganizing it! I dug around and resurfaced with a 20 year old Ikea-type white and sturdy table on rollers: a blank canvas. Perfect.

I remembered this great image I had seen on my very favorite blog, Little Green Notebook, a few years ago.

deskinspo
deskinspo

Check out that little Parsons side table covered in maps! It's from a room designed by Nick Olsen, who is just fantastic.  He was nice enough to talk to me about the design field when I was in the midst of job hunting and soul searching and gave really helpful insight and tips about getting a foot in the door of the design industry (Thanks Nick!!).

Maps have always been my thing, and I liked the way Nick's side table drew attention and interest without being over the top. Another hunt through storage led to an old atlas book from the 80s, which I commenced cutting up into big, mostly uniform sizes for decoupaging onto the desk. (Smaller pieces would've worked too, but I was a bit pressed for time.) I picked maps from the atlas where I had travelled or lived, or maps that I found to be exceptionally pretty, like the ocean maps that I put on the ends of the table.

diydesk1
diydesk1

Decoupage is terribly simple and there are loads of how-to pages with a quick Google search--or just use the directions on the tub of Mod Podge (I prefer the glossy finish). After making sure the desk was completely clean, I took the atlas pages I had neatly cut and laid out where I wanted them to be placed so that all of the white of the desk was covered, trimming them to fit if necessary. I also kept in mind color themes while doing this: I tried to keep edges all white maps, ends all ocean maps, etc. This made the maps seem a little less haphazard to me. Then, one by one, I brushed on a thorough--but not over-the-top--layer of Mod Podge with a foam brush (I like using these cheap foam brushes when I want to avoid brush strokes), and I coated the surface of the desk on which I planned on applying the page with a layer, too. I think it's helpful to let the Mod Podge dry for a few seconds to get a little tacky, and then I started in the middle of the top (although I probably should've started on the back... less pressure in case I messed up!) and worked out from there, smoothing the pages as I went. I find that less is more when it comes to Mod Podge... otherwise it wrinkles the pages. After each page had been placed, I covered it again with another layer of Mod Podge to seal it and keep any edges from peeling up.

diydesk2
diydesk2

The edges were a bit tricky, but I folded pages to fit around the turns of the piece, making sure I really creased the folds. This needed more Mod Podge to hold, and I found that making the piece a bit bigger made it stay because it had more surface area to hold on to.

diydesk3
diydesk3

I followed the drying instructions on the Mod Podge container and then took the desk outside to spray on a layer of polyurethane... I prefer glossy here, too. (This is optional, but I chose to do it because I knew it would be in a high-traffic spot.) This--horror of horrors!--made everything wrinkle dreadfully! So I covered the piece with a towel and stacked heavy books high to force the wrinkles out, with success. Crisis averted.

diydesk5
diydesk5

That's it! I had a piece of glass cut for the top and have been messing around with the containers, etc ever since. I'd like a proper desk lamp and definitely need to hide those cords. And need a filing cabinet! The list gets longer! To be continued... :)

desk1-4
desk1-4
desk1-3
desk1-3
desk1-5
desk1-5

The Sophisticated Pom-pom

Hello! I'm back! I've kicked off the new year with a few little upgrades in my apartment; here's one of them. Let's back up a few months. When I was searching for ways to squeeze a little more storage space out of my little studio, one solution was to make the most of the under-the-bed storage. This meant simply using bed risers (yes, the same ones from freshman year dorms), which both gives me far more space and makes the bed so high that I all but need a running start to get in. :) Of course, I couldn’t leave that unsightly view uncovered, so I made up a quick and cheap bedskirt.

Screen Shot 2015-07-15 at 9.06.51 AM

The beauty of making my own is that I could have a completely custom cover—it would be very difficult to find a bedskirt that I wanted in that length—for a fraction of the cost of having it made by an upholsterer. I used a painter’s drop cloth, one of my favorite sources for inexpensive, heavy-duty fabric.


Screen Shot 2016-01-13 at 2.30.00 PM

I cut it to size, leaving extra room at the top to tuck in between the mattress and box springs. Then I hemmed it all around to prevent any fraying down the road. I left it just like this for a while; I kind of liked the simplicity. Then I ran across these bedding images and instantly became obsessed with this version of what I like to call a "sophisticated pom-pom":

From Mui Ma:

Screen Shot 2015-12-01 at 10.58.56 PM

So simply lovely. Via L'Aviva Home:

Screen Shot 2015-12-01 at 11.02.11 PM

Other color options available too (here):

Screen Shot 2015-12-01 at 11.03.45 PM

And this from Urban just makes my heart sing:

Screen Shot 2015-12-01 at 11.06.28 PM

I happened to have several samples of this trim (from Samuel & Sons) left over from various projects, which I negotiated to a spacing that I liked; the poms here are about 7" apart. (This city has some terrific trim stores, though: I've had great luck at Mokuba and M&J Trimming, but if you just walk around the garment district--especially 36th to 40th Streets between 6th to 8th Avenues--you'll stumble upon many other gold mines.) The trick for this look is to find BIG pom-poms. I also especially like these because they're not too white; they're actually the same ecru color as the drop cloth. Match made in heaven.

Screen Shot 2016-01-13 at 2.21.34 PM

After spacing them, I simply sewed a few stitches on each to keep it in place and called it a day! From start to finish, this little project took all of 30 minutes, and I am so pleased with the result. The poms just make me smile!

Screen Shot 2016-01-13 at 2.22.04 PM

Screen Shot 2016-01-13 at 2.22.16 PM

Screen Shot 2016-01-13 at 2.21.53 PM

I loved seeing so many of you over the break--and I can't tell you how wonderful it was to hear that you've been reading The Spoonful! So nice and I so appreciate it.

And if you have a DIY you'd like to share on The Spoonful, send it on over!


Unleash the Pollock Within

When I decided to move into a studio, I knew I would need to finagle a divider to define the spaces. It's nice both for myself and for guests to know the living space from the private or sleeping space, even though there's no wall between the two. entry left wall

Remodelista blogged about a few ideas here, and Buzzfeed has an article here. Here's some inspiration that I played with, too:

This room is just fantastic, packing a double punch with the dividers by using both curtains (attached on only part of the ceiling and not meant to be fully closed) as well as the screen/plant combo. Those herringbone floors... I could move right in.

Screen Shot 2015-07-21 at 1.34.34 AM

Another screen. Wouldn't that be a fun DIY??  Screen Shot 2015-07-21 at 1.37.47 AM

I love this screen because it doesn't obstruct the view or, more importantly, the light, but cues the separate parts of the room. (The rest of the image is a little froo-froo for my taste but how crazy is that wallpapered ceiling?!)

Screen Shot 2015-07-21 at 1.39.18 AM

Bookshelves are a fantastically functional use of space... especially airy ones like these that let light come through:

Screen Shot 2015-07-21 at 1.38.33 AM

Here's an example of very thin, narrow shelves that act as a divider:

Screen Shot 2015-07-21 at 1.38.57 AM

Great curtains (can you spy the Jielde lamp, like I talked about in this post??):

Screen Shot 2015-07-21 at 1.38.19 AM

Another curtain divider here:

Screen Shot 2015-07-21 at 1.37.29 AM

I considered all of the above ideas before settling on the curtain, which I like because it's lightweight, lets sunlight through, and doesn't distract too much  from the rest of the space. I didn't have the perfect spare curtain lying around, so I decided to make one myself. Keeping in mind something simple, light, neutral, but with a bit of glam, I thought a Pollock-inspired divider would be simple, quick, and  have just the effect I was after.

Screen Shot 2015-07-21 at 2.02.55 AM

I grabbed a clean, white, flat bedsheet from my mother's linen closet, some gold paint, and a paint brush. After laying the sheet out, I commenced to splattering. To figure out how best to splatter the paint, I studied a few photos of Pollock while working:

Screen Shot 2015-07-21 at 1.59.34 AM

Screen Shot 2015-07-21 at 2.01.36 AM

I liked how his pieces have both the drip drops of paint, as well as the longer lines that have been flopped down with the flick of a wrist.

Screen Shot 2015-07-21 at 2.06.15 AM

Because I wanted plenty of light to shine through, I leaned toward more background, less paint, like this of Pollock's:

Screen Shot 2015-07-21 at 2.06.59 AM

I also studied how Pollock made his paintings into fields ("field" refers to a painting, surface, expanse, etc that has no distinction between figure and ground), like these:

Screen Shot 2015-07-21 at 2.07.24 AM

Screen Shot 2015-07-21 at 2.07.11 AM

... and tried to do the same in mine by avoiding having either clusters of paint or expanses of white, as in this "during" photo of my own:

Screen Shot 2015-07-21 at 2.14.14 AM

And finished:

Screen Shot 2015-07-22 at 12.46.54 PM

Then I hung it up by attaching a heavy duty wire into the wall with screw-in hooks from the hardware store:

Screen Shot 2015-07-22 at 12.47.16 PM

Later, I added a little black velvet trim to the edge to finish it. I would definitely recommend doing this before hanging up the curtain, but fabric glue got it to stick (would've been much easier if the sheet were lying horizontally instead of vertically!):

Screen Shot 2015-07-22 at 12.47.07 PM

Now I need a chic little tieback and I'll be set! Stay tuned for a DIY on that to come :)

Screen Shot 2015-07-15 at 9.06.51 AM


Screen Shot 2015-07-22 at 1.08.50 PM

Screen Shot 2015-07-22 at 12.47.25 PM


Bedding Facelift

I love my white bedding (as I mentioned in this post), but it's a little dingy. Okay, it's more cream than white now. Understandably so--I've had it for maybe ten years, including all of college?! Yikes. My college room:

Screen Shot 2015-07-15 at 12.22.16 AM


New city, same cover:

Screen Shot 2015-07-15 at 9.10.13 AM

It's worn-in in that wonderful way that only constant use and many washes can produce, and for that reason I've been putting off replacing it... but I think the time has come for a fresh cover.

Screen Shot 2015-07-15 at 9.03.41 AM

Screen Shot 2015-07-15 at 9.06.51 AM

I'd like to keep the bed white for a multitude of reasons: calming, crisp & clean looking, blank canvas for patterns elsewhere. I love the pattern in the coverlet here:

Isn't this setting just to die for?! I'm imagining  a duvet cover in the pattern of those front throw pillows. And the wavy white shams... adore.

Amazing pom-poms:

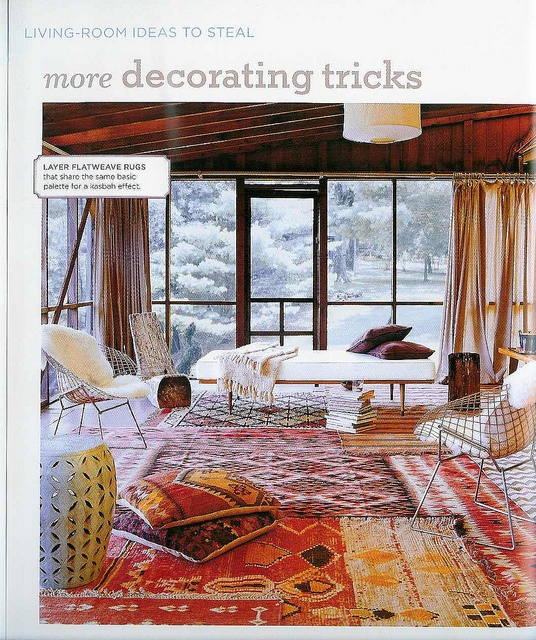
Quite similar to this cover from Urban Outfitters:

So calming.

I really love the pattern in my coverlet now and have had the hardest time finding something similar.

Screen Shot 2015-07-15 at 9.07.50 AM

It's neither too geometric nor too floral, but still feminine. This cover that I have now is a matelasse, meaning that it looks like it's quilted or padded but actually isn't, and it's nice and lightweight... but I could switch to a duvet, too.

I've been mulling over a few options, like this one on eBay (free shipping and 60-day returns?! I can handle that):

Screen Shot 2015-07-15 at 12.28.03 AM

Simplicity from Anthropologie:

Screen Shot 2015-07-15 at 12.31.18 AM

Another very simple spread (and close up) from Anthro:

Screen Shot 2015-07-15 at 12.33.19 AM

Screen Shot 2015-07-15 at 12.34.09 AM

Do you have any sources for bedding?? Let me hear them in the comments below!

DIY: Extension Cords

Hello and happy weekend! A few weeks ago I was in a new store in Brooklyn Heights called Collyer's Mansion (named after the compulsive hoarding Collyer brothers), where I saw these fantastic and oh-so-functional extension cords: Screen Shot 2015-07-10 at 6.04.51 PM

So much better looking than any other extension cord I've ever seen! The cord itself is wrapped with string/thread which makes it less prone to tangles. I just love when everyday, necessary pieces are made beautiful.

Screen Shot 2015-07-10 at 6.04.58 PM

I immediately thought of the unsightly cords running through my apartment and had one of those "I could make that" moments. So I did, and here's how.

You'll need:

  • extension cord
  • string
  • scissors
  • binder clip
  • tape (I used gray washi tape, but regular Scotch would do)
  • patience :)

I had this neon string leftover from Christmas decorations that I had picked up at my local hardware store, and what could be better than a jolt of neon green for a little pick-me-up on such a pedestrian object?! Below are options in neon-y colors, but most any string would work for this project, like crochet yarn or standard package string. Good to keep in mind that thicker string wraps more quickly than thin--but I would advise against going too thick because it gets bulky.

I began by laying about an inch of string flush on the cord, cut end towards the expanse of cord to be wrapped, and started wrapping from the end with the plugs (I don't have pictures of this step--oops--but see below where I overlap with pink string. It's the same process!). I made sure to keep the wrapping tight and close together.

Screen Shot 2015-07-10 at 6.05.12 PM

The hardest part was keeping the string from knotting on itself, but patience is key! I found that wrapping the cord once then pulling the ball of string through and around, and repeating over and over like that, worked the best to avoid tangles (and hair pulling frustration).

Screen Shot 2015-07-10 at 6.05.06 PM

It took a few hours, but it was strangely soothing--and addicting--to see how far along I could get. I found myself picking it up for a few minutes here and there, like how one might with knitting or other handiwork. When I wanted to take a break, I secured the string in place with a little binder clip to prevent unraveling until I picked it up again.

Screen Shot 2015-07-10 at 6.05.43 PM

At the end, I ran out of green and decided to switch it up with hot pink to finish it off. First I cleanly cut the green string and taped it to the extension cord using matching gray washi tape that I happened to have on hand:

Screen Shot 2015-07-10 at 6.05.49 PM

Then I laid the new color on top and taped around it. I made sure that the tape was smooth to have a seamless transition and to keep it from being too bumpy.


Screen Shot 2015-07-10 at 6.05.57 PM

Then I kept on wrapping! (Like I mentioned, this is the same process as starting in the beginning.)

Screen Shot 2015-07-10 at 6.07.30 PM

When I got to the end, I taped the pink off, like I had with the green earlier, and wrapped over it again. I didn't cut it until the end, when I knotted it multiple times to keep it from coming undone. You can see where the end is doubled over:

Screen Shot 2015-07-10 at 6.06.16 PM

Screen Shot 2015-07-10 at 6.06.03 PM

By ending at the plug-in part (my extension cord vocabulary is lacking...), the tie-off isn't as noticeable because it's hidden when it's plugged into the wall.

Ta-da!

Screen Shot 2015-07-10 at 6.05.28 PM

Screen Shot 2015-07-10 at 5.19.36 PM

And since I had all that string left, I decided to do another cord!

Screen Shot 2015-07-10 at 5.19.26 PM


Screen Shot 2015-07-10 at 6.07.19 PM


Screen Shot 2015-07-10 at 5.19.51 PM

Nothing groundbreaking, but I love the little details. And I think a little neon here and there is fun in any space. I find that neon can be thrown in with most any color scheme just because it's so crazy. And much better than the utilitarian extension cords from before, don't you agree?

Screen Shot 2015-07-10 at 5.32.01 PM

Screen Shot 2015-07-10 at 6.07.24 PM

Screen Shot 2015-07-10 at 6.07.08 PM


Have you tried this DIY? Would you like to see another DIY on The Spoonful? Let me know in the comments below!

Lantern Upgrade

I must have lighting on my mind, this time in my entry. While I love the action on the walls, all that busy-ness can't distract me from the rather dreadful light fixture situation going on up on the ceiling. FullSizeRender-19


FullSizeRender-18


I have this *lovely* habit of buying things--for a steal of a price, bien sûr--that I don't need now but will *surely* need in the future. Such was the case when I bought this gem at the local thrift for $10.

FullSizeRender-17


It sat in my parents' garage for a solid four years, but I didn't forget... and I think it might just be the perfect improvement for my little entry. I know it's seen better days, but some paint and Windex (and new glass and new chain...) will do wonders, I'm convinced. (Let it be recorded that the embarrassingly vast majority of items bought as "I don't need this now but I'm sure I might maybe possibly need it sometime in the indefinite and unruly future" have yet to be transformed. Maybe I'm turning a new leaf?!)

But what color to paint? Of course, there's ample inspiration to be found on Pinterest. Here's an example in a metallic:

Hello, red:

I'm a fan of how this lantern is a bit invisible, blending into the ceiling:

Can't go wrong with black (and a two-toned Dutch door never hurts, either):

Loving this updated take on a black lantern shape:

And another great shape in black (with another fantastic Dutch door):

Stay tuned for the upgrade process! Until then, I'll be reading up on how to become an electrician...

Page One

Hello! I've finally bitten the blogging bullet after many years of procrastination. "Spoon" is my nickname, and a "spoonful" is what I'll provide: of design inspiration, of DIYs, and of my journey through life in New York City as an interior designer. I thought I'd make my entry into the blogosphere with another type of entry: to my apartment. They say a painting is never finished but merely abandoned--I'd say the same for my little studio. I moved to NYC one month shy of a year ago (!) and have really loved every second. One part I especially cherish about living alone is that the space is entirely my own and therefore mine to decorate as I please. My entry (which doubles as a hall and triples as a mudroom) was looking a little bare, so I turned it into an inspiration gallery of sorts and also outlined the door frames with subtle gold washi tape.

entry left wall

I had pinned (search "washi") bunches of washi tape inspiration images and felt like my own space could use a little glitzy uplift, so I headed to Paper Presentation (aka a small heaven of paper goods in Flatiron) and grabbed all of their gold washi tape (washi tape, if you're unfamiliar, is basically pretty masking tape, originally from Japan, that comes in every color and pattern imaginable). Then I stuck it up around the door frames! Simple. I wanted a bit of wall space between the frame and the tape to give more dimension, and I was careful to keep the spacing uniform throughout.

close up washi tape

For the inspiration gallery, I started by rifling through stacks of pamphlets and assorted papers that I had found too interesting to toss. The clippings are of images that called me to look twice: gallery pamphlets, postcards, drawings of my own, cards from my dear mother, and even an exceptionally beautiful aquarelle bird from my favorite 8-year-old, the very talented India.

entry right side from entrance

I started in the middle of the walls, at eye level, and worked up and down and all around from there, attaching the images with washi tape again. Using the washi tape lets me see how the pictures are stuck to the wall and gives a boho chic feel, I think--makes moving them around easier, too! Win-win. As I add on, I can even layer over top of the base layer of pictures. And now I have a reason to pick up all the fantastic postcards and flyers that vendors set out!

right side entry from inside room

What I love about this is the way the pictures come together as a sort of wallpaper and how the bits of washi tape attachments give the images the freedom to flutter in the wind... which has been happening a lot lately because spring has finally sprung in this city.

entry from inside room

Thanks for sharing my first post with me... and stay tuned for more Spoonfuls coming up!