Throwback DIY: Albert Hadley Walls

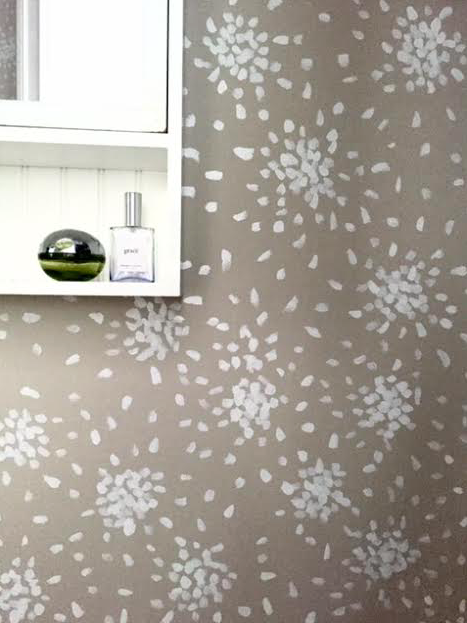
Many, many years ago, before I even knew the name Albert Hadley, I pinned this image of a bathroom wallpapered in a print ("Fireworks") by the design great: Screen Shot 2015-10-25 at 3.39.02 PM

A quick design history lesson... Albert Hadley was one half of the design company Parish-Hadley--"the erudite yang to Sister Parish's freewheeling yin," as Architectural Digest describes him here--who brought about wonderful things in the world of interior design. His clients included the Rockefellers, the Astors, and the Kennedys, to name a few, and his signature lay in creating a comfortable room with some punchy kick to keep things interesting. Though Mr. Hadley passed away a few years ago, his legacy lives on in many ways--including this wallpaper!

One college summer, I decided my lime green bathroom needed a facelift (really wish I had a "before" photo!), and, remembering that great image, I decided to do a little Hadley-inspired DIY.

Screen Shot 2016-01-18 at 10.48.41 PM

First things first: paint the walls. I picked a sandy off-white neutral; this bathroom gets very little sunlight so I made sure to choose a light color, without feeling too sterile.

For the "fireworks," I picked a high-gloss white, the whitest white; the glossiness helps the white stand out against the sandy background color. Once the wall color was good and dry, I mapped out my pattern lightly with a pencil, taking care to space the fireworks correctly. This is one of those steps that takes a long time but makes such a difference and actually saves time--and headaches--in the end!

Then I got to work! I found it important to have enough paint on the brush each time so that the fireworks didn't look too painterly (a look I often love but not here).

Screen Shot 2016-01-18 at 10.48.27 PM

Screen Shot 2016-01-18 at 10.48.33 PM

I'm still so pleased with the result, even several years after completing the paint job. And it was absolutely more budget-friendly than installing genuine Albert Hadley wallpaper! Maybe one day...


Page One

Hello! I've finally bitten the blogging bullet after many years of procrastination. "Spoon" is my nickname, and a "spoonful" is what I'll provide: of design inspiration, of DIYs, and of my journey through life in New York City as an interior designer. I thought I'd make my entry into the blogosphere with another type of entry: to my apartment. They say a painting is never finished but merely abandoned--I'd say the same for my little studio. I moved to NYC one month shy of a year ago (!) and have really loved every second. One part I especially cherish about living alone is that the space is entirely my own and therefore mine to decorate as I please. My entry (which doubles as a hall and triples as a mudroom) was looking a little bare, so I turned it into an inspiration gallery of sorts and also outlined the door frames with subtle gold washi tape.

entry left wall

I had pinned (search "washi") bunches of washi tape inspiration images and felt like my own space could use a little glitzy uplift, so I headed to Paper Presentation (aka a small heaven of paper goods in Flatiron) and grabbed all of their gold washi tape (washi tape, if you're unfamiliar, is basically pretty masking tape, originally from Japan, that comes in every color and pattern imaginable). Then I stuck it up around the door frames! Simple. I wanted a bit of wall space between the frame and the tape to give more dimension, and I was careful to keep the spacing uniform throughout.

close up washi tape

For the inspiration gallery, I started by rifling through stacks of pamphlets and assorted papers that I had found too interesting to toss. The clippings are of images that called me to look twice: gallery pamphlets, postcards, drawings of my own, cards from my dear mother, and even an exceptionally beautiful aquarelle bird from my favorite 8-year-old, the very talented India.

entry right side from entrance

I started in the middle of the walls, at eye level, and worked up and down and all around from there, attaching the images with washi tape again. Using the washi tape lets me see how the pictures are stuck to the wall and gives a boho chic feel, I think--makes moving them around easier, too! Win-win. As I add on, I can even layer over top of the base layer of pictures. And now I have a reason to pick up all the fantastic postcards and flyers that vendors set out!

right side entry from inside room

What I love about this is the way the pictures come together as a sort of wallpaper and how the bits of washi tape attachments give the images the freedom to flutter in the wind... which has been happening a lot lately because spring has finally sprung in this city.

entry from inside room

Thanks for sharing my first post with me... and stay tuned for more Spoonfuls coming up!